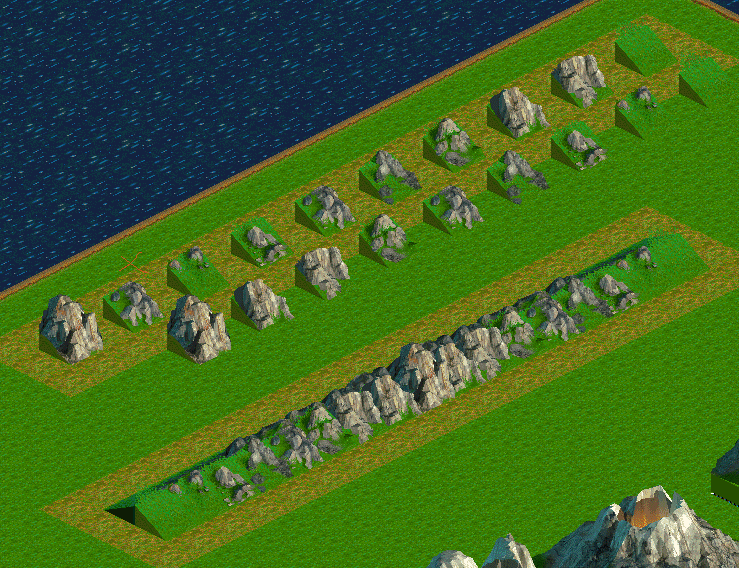
Okay, lets have a look at the different types of mountains first:First of all we select a 50X50 island in the Inseleditor and on that we mark an area of 35X35 tiles.
The fastest way to make this: place the cursor to the top left and, with pressed left mouse key, and move the mouse towards the right bottom side.
In the status line of the Inseleditor you can read for example: "marked: 1225 fields of [3/4] size [35/35]". That is, I have begun on the field with the coordinates 'X3, Y4' (from the beginning 3 to the right and 4 down) and marked an area of 35x35 tiles (altogether 1225 marked fields).
Okay after this area is marked, select from the FELDEDITOR the tile country fields 1/COUNTRY the country tile #101 and click on CHANGING. On this country area, we now place the mountains that we have:
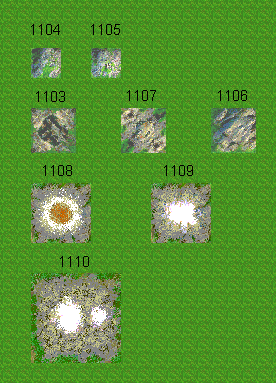
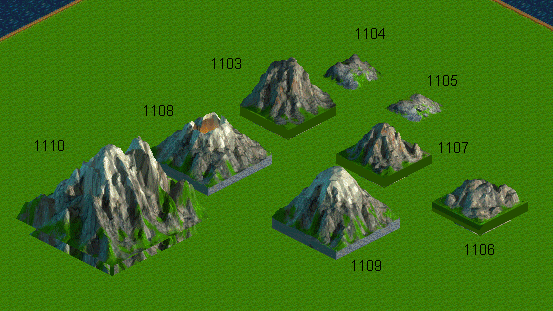
a) the 2X2 mountains #1104, #1105
b) the 3X3 mountains #1103 (the highest of that three), #1107 and #1106 (a hill)
c) the 4X4 mountains #1108 (volcanoes) and #1109 (snow-covered)
d) the 6X6 massively #1110 (snow-covered)
|
|
When setting objects that are larger than a 1*1 tile, it is to be noted that allways the left, top point is set. Therefore a 3*3 object extends of this point 3 tiles to the right and 3 tiles down.All the MOUNTAINS (except the 2x2 ones) have one thing in common: they begin practically 'one level' above the ground. There must be set a row of ROCKS.
There are 9 different rock-tiles. It goes from "entire without stone" until "full of stone"... one tile is always rockier than the other. These ROCKS are set practically as a frame around the mountain-tile, exactly following the contours of the mountain formation.
Besides the 9 straight tiles, INNER and OUTER CORNERS are required (of which there is a rocky variant and one without rocks)
Into this ROCKS the RIVERS start, therefore here is also the SPRING accommodated.
You certainly noticed the red points on the rock tiles. That serves to the orientation and must point always TOWARDS THE ROCK (and/or in CORNERS always TOWARDS THE CORNER).
The construct of some mountains resembles the basic construct of the islands; each mountain must be complete surrounded by ROCKS or other MOUNTAINS. Mountain tiles should either be placed directly next to one another, or at least with a space of 2 fields between them, so that the rock tiles can correctly be set.
Rock tiles can also be merged without mountain tiles. It is to be noted that at such compositions no mine can be mounted, but SOURCES can be put in there.
The big exception here are the 2X2 MOUNTAINS. Unlike the mountains, they are on same Level as the country tiles and no rock tile are placed around them. Neither sources can spring at them, nor can mines be mounted here in the game. A further peculiarity is that the TURNING shows effect to both tiles in the game/Editor (unfortunately not on the other mountains).
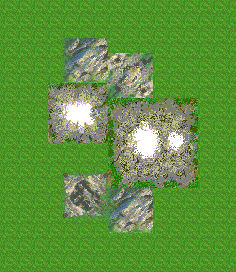
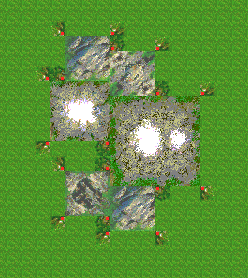
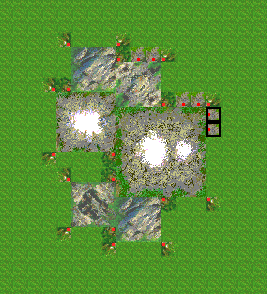
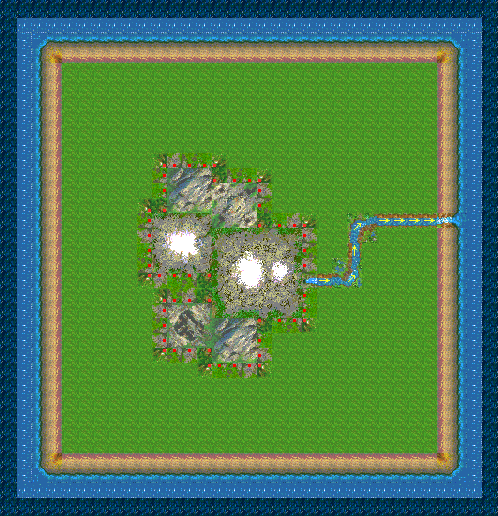
Okay, we want to compose some mountains..
We set, like shown below on the picture,
- a 6X6 massively
- a 4X4 mountain
- 4 3X3 mountains/hills
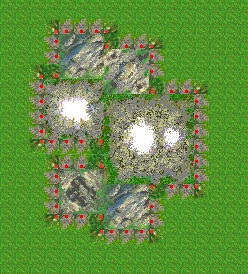
Now we set first of all the INNER CORNERS (in our example are the 7 piece), and we choose the rocky variant #2342. We will keep in mind that the red spot must point always TOWARDS THE ROCK!
After that we select the OUTER CORNERS (in our example 11 piece), and we also choose the rocky variant #2322.
We will set now the ROCKS STRAIGHT. For that we mark two neighbour tiles as shown in the next image. Then we select the tiles ROCKS STRAIGHT 2 out of the FELDEDITOR (#2302) and click on CHANGING.
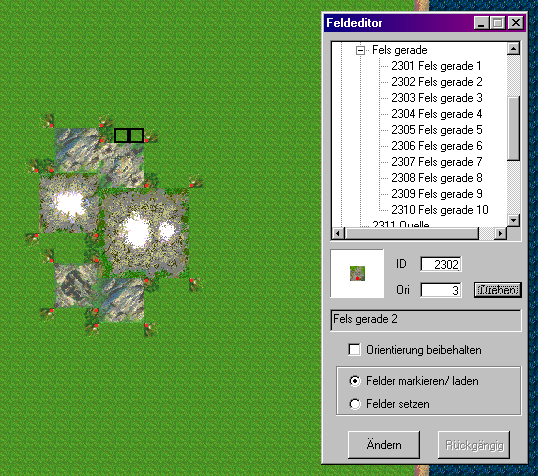
Voila... both marked fields were filled with the tile #2302.We leave both fields marked, click the right mouse key and select the function COPYING out of the context window. Then we place these copied fields to their correct places..
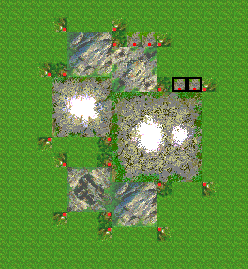
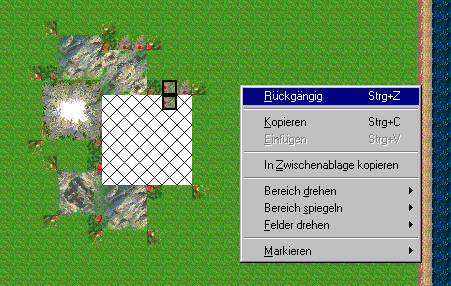
In order to have this 'team' now also in the other orientations, we do the following: both tiles are still marked... we click the right mouse and select from the contextmenu the function AREA TURN/RIGHT.

Depending on where and which area you move it can be that the picture becomes 'destroyed' through overlapping areas. No panic! We only want to make a copy of the changed area - after that we UNDO the action again.Therefore after the TURN/RIGHT in the Kontextmenu and COPYING, call the contextmenu again and select UNDO. The last changing on the current Image will be undone, and in the buffer you have the copy of both tiles turned to the right.
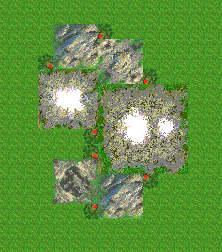
We place this copy to all the corresponding places at our mountain massive, and we repeat this stepy for the other orientations, too, until the massive is properly surrounded by ROCKS.
We remember from the BEACH and the EMBANKMENT that 'variation' is the "one and all" for a good-looking island. Therefore we
want to set some alternative ROCKS STRAIGHT. For this we also want to look at a new procedure..Like shown below we pick some of the ROCKS STRAIGHT tiles, and we do so by holding the CTRL-key pressed while clicking on various tiles of all 4 orientations.
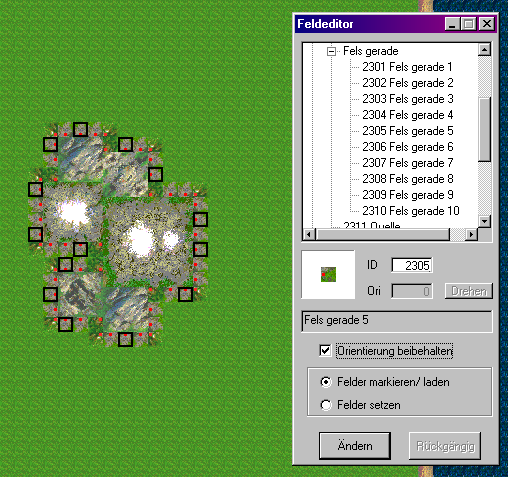
Then we select the tile ROCKS STRAIGHT 5 (#2305) out of the FELDEDITOR. In addition we now activate the function KEEP ORIENTATION. Then we click the button CHANGING..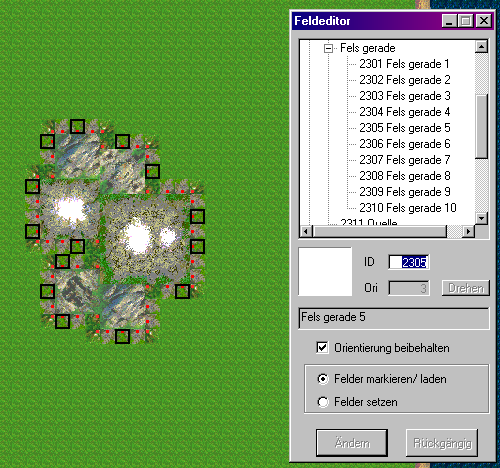
WOW... it works! :)
We want to add a further, alternative ROCK STRAIGHT tile. Like previously, we mark some tile with pressed STRG-key,
select the ROCK STRAIGHT 8 (#2308) from the FELDEDITOR and click on CHANGING with activated function KEEP ORIENTATION.
We want to look at this work in the ANNO-Editor... (don't forget to save before!)...
Well well, not bad, isn't it?
We will have a close look at the ROCKS now.
For that we place in the Inseleditor the ROCK tiles one after the other, beginning with ROCKS STRAIGHT 1 (#2301). Leave at least a space of one tile between the single tile.
Then save and have a look at the rocks in the ANNO-Editor:
I additionaly arranged the tile so that the first tile has THE LEAST rocks and the last tile MOST. The following sequence arises:standard: #2301 - #2302 - #2303 - #2304 - #2305 - #2306 - #2307 - #2308 - #2309 - #2310
newly: #2301 - #2308 - #2307 - #2305 - #2306 - #2304 - #2302 - #2303 - #2310You surely have noticed, that the tile #2309 is missing, and that it is marked obviously in the Inseleditor and in the ANNOeditor with a red X. If you look closely again at the single rock tiles in the ANNOeditor you'll notice that tile #2309 and #2306 is not only identical, but the image also is not complete. Obviously a graphics mistake - in any case this tile should never be set in the game.
I set a combination of rocks, that together with the corresponding inner and outer corners can serve as a mountain region. And thats the sequence for it:
#2301 - #2308 - #2307 - #2305 - #2306 - #2304 - #2302 - #2303 - #2310 and back to #2301.In a next step we simply change the text file "description. txt" in which the FIELDEDITORs outlook is defined. Thus we don't have to memorize the new sequel of ROCK tiles.
Rocks
Rocks straight
2301 Rocks straight 1
2302 Rocks straight 2
2303 Rocks straight 3
2304 Rocks straight 4
2305 Rocks straight 5
2306 Rocks straight 6
2307 Rocks straight 7
2308 Rocks straight 8
2309 Rocks straight 9
2310 Rocks straight 10
we change the text f.e. to this (I have deleted #2309):
Rocks
Rocks straight
2301 Rocks A straight 1
2308 Rocks B straight 8
2307 Rocks C straight 7
2305 Rocks D straight 5
2306 Rocks E straight 6
2304 Rocks F straight 4
2302 Rocks G straight 2
2303 Rocks H straight 3
2310 Rocks I straight 10
While we are there already, we want to include the most prominent (and onliest) 'lost feature' "the high seat". For that we go to the end of the file and insert there following lines:
Extras
1801 high seat
823 market place's ruins
831 castle
851 monument
853 triumphal archI registered the MONUMENT because you cannot set it in the ANNO-Editor. While testing some ID's for possible other 'lost features' I've found the ID's of the TRIUMPHAL ARCH (3*1) and the CASTLE (7*5), and more: the MARKET PLACE'S RUINS (6*4)... so I also added it.
I would like to propose the following change, preparing on that we want to set a decorative river next. For the sake of simplicity we integrate the WATERFALL, RIVER MOUTH and SPRING to the RIVERS section in the FIELDEDITORS Description.txt, and this should look like that afterwards:
Rivers
901 River (straight) 1
902 River (straight) 2
903 River (arm)
904 River turning 2x2
905 River turning 2x2
1071 Waterfall
1208 River mouth
2311 FountSo we have all tiles in matters of RIVERS all at once, that we would have to seek in four submenus otherwise.
That's it. Save and close the file and shut down the FIELDEDITOR in the Inseleditor. Only after opening it again our changings become active.
We select SOURCE (#2311) and set it with orientation 0 into a rock row at the right hand side. Next we select RIVER STRAIGHT 1 (#901) and we notice a yellow arrow on the tile. This arrow indicates the river direction. Generally the arrows should all point into the same river direction. Therefore the river bend is available twice - one for each river direction.
In the river formation it is to be respected that in the game exclusively the tiles (#901 and #902) are 'walkable and buildable'. All other tiles are impassable or impossible to build upon. Therefore one should consider to set at least 1 tile RIVER STRAIGHT directly behind spring, between two river bends and directly before a waterfall so that in the game a bridge can be constructed there.
As we finally arrived at the embankment we set a WATERFALL (#1071) and directly behind it a RIVER MOUTH (#1208) - both in orientation 3. That's how it should look alike then:
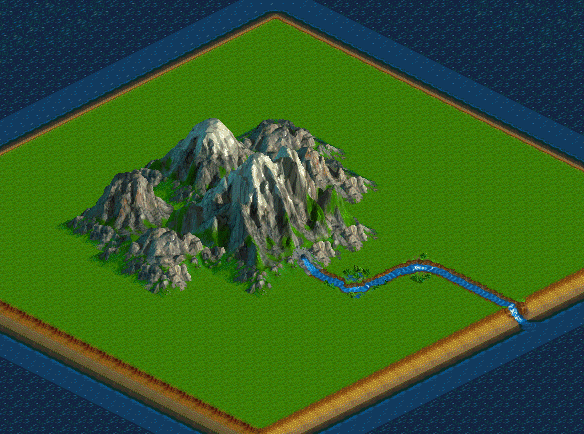
We notice: the SOURCE is a rock tile, the WATERFALL is an embankment tile and the RIVER MOUTH is a coasts tile.If there are any more questions or remarks on that topic, please feel free to give me some feedback here: ANNO-Homepage. Well, I hope you will enjoy the creating of new anno islands...
Dirk "The Guardian" Richartz (8/2000)
|
|